Seven months later, this project is finally complete. The title, "Under the Microscope" intends to capture the meaning that I derive from the shapes and textures in this design. I've always thought it looks like layers of cells that one might see through a microscope. The design itself was created by my wife, Emily Worsnopp. This piece measures about three feet by five feet and is composed of basswood and acrylic paint. At its thickest (or deepest), it measures 4 inches. I achieved this depth/height by stacking three 1 1/2 inch boards on top of one another and then carving them into the shapes you see above. If you're familiar with my faux-mosaic pieces, then you know that no tile was used in this project. Rather, I carved the wood surface to look like tile, removing wood to create "grout" lines. See the project timeline below to see a step-by step description of the project from start to finish.


7 months later, this piece is just about finished. Another coat of paint and a layer of polyurethane will bring it across the finish line.
|
 |
| Painting of the background is complete! What a difference it makes to finally have some contrast between the different layers! |
 |
| And the painting begins. |
This design features a variety of different layers that criss-cross, overlap, and interact with each other in interesting ways. I look at the original design and my mind imagines layers of cells as one would see through a microscope; hence the title of the piece. It measures 55" by 25.5" The plan was to carve this design into a large "canvas" made up of several boards that are glued and screwed together. Like the original design pictured below, the carving will have the appearance of ceramic tile. However, it will be a faux-mosaic, with the tiles being carved into the surface of the final product and then painted.
 |
| You can see in the photo above that the "ribbon" extends onto the frame and over the side. Since the carving is composed of several boards that are glued and screwed together, if you follow the length of the ribbon over the entire carving, it is composed of more than seven different sections of boards. |
 |
| In the corner of this piece above, the "ribbon" that extends across the carving stopped at the edge of the frame (see earlier photos below). However, I wanted to have the ribbon extend up onto the frame and over the side to give it more depth and three dimensional flavor. The photo above shows how I added wood to the edge by gluing and clamping a piece of wood and then carved it to match the rest of the ribbon. |
 |
| Note in the bottom right corner how the "ribbon" ends at the edge of the frame. The plan is to glue additional wood to the frame and carve it to match/continue the ribbon over the edge. You might also note that there is a hole/gap in the boards right above the end of the ribbon in that corner. I will fill that gap with a small section of wood cut to fit that space. |
Design by Emily Worsnopp. The design pictured above was created by taping several plain, white papers together to form a larger canvas. It measures 55" by 25.5" The plan is to carve this design into a large canvas made up of several boards that are glued and screwed together. Like the picture above, the carving will have the appearance of being made of ceramic tile. However, it will be a faux mosaic, with the tiles being carved into the surface of the final product and then painted.
The design features a variety of different layers that criss-cross, overlap, and interact with each other in interesting ways. This provides a lot of inspiration to a woodcarver like myself. To really create some depth in the carving and to achieve a truly three-dimensional effect, I will stack boards on top of the surface layer and carve them in such a way as to merge them seamlessly with the boards beneath them. In the photo below, i have begun tracing an outline of the design onto four basswood boards.

In the photo below, you can see how i have stacked three layers of boards on top of each other. The base layer will form the background and frame of the piece, and then I have selectively stacked boards in the shape of certain design elements to create some height/depth. Step one in this process required that i decide which parts of the design i wanted to be highest and lowest. Which layers would be in the background (the lowest), and which parts of the design would tower over the rest? I then cut the boards to match the parts of the design that i wanted to be higher and stacked them on top. The next step was to begin carving the stacked layers down to merge with the layers underneath them.
 |
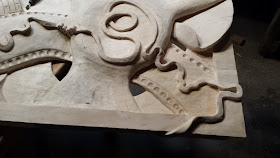
In the foreground of the photo above (and below), you can see where the project will be at its tallest, with three layers of boards stacked one upon the other. My plan is to create a hollow space within so that you will be able to look into the carving as through a window and see another design inside (see updated photos in which this has actually come to fruition). I explain a bit more below.
Note the top board in the shape of a cylinder (more or less), with the tiled design drawn on it in the shape of a spiral. There are six "ribbons" that spiral outward from the middle. The plan is for this board to be carved into a conical shape; hollow on the inside. The space between the "ribbons" will be carved away, and you'll be able to see through them into the hollow space within. Now imagine that this layer will be glued on top of the board below it, which I will also hollow out deeply, even extending into the base layer on the bottom. |
 |
| The original design features a variety of overlapping shapes and textures that weave around and over each other. Adding the second layer of boards over certain parts of the design will help to create a piece with more depth and three dimensionality. |
 |
| First layer of boards, with second layer set to the side (minus one piece on the right side). |
 |
| I used tracing paper that I pierced with the tip of a knife to transfer the design onto the wood. |
 |
| In the center you can see how I've begun to round the edges of the boards in the top layer. |
Will Worsnopp, Dickinson College, Bronx High School of Science, Sidney Central School, carving, powercarver, MATSL, Bennington College,


No comments:
Post a Comment